Saturday, February 11, 2012

Craft Room Project - Part 4, Shelves!

Craft Room Project Series begins here.

Part Two, painting, is here.

Part Three, Burlap Curtains, linked here.

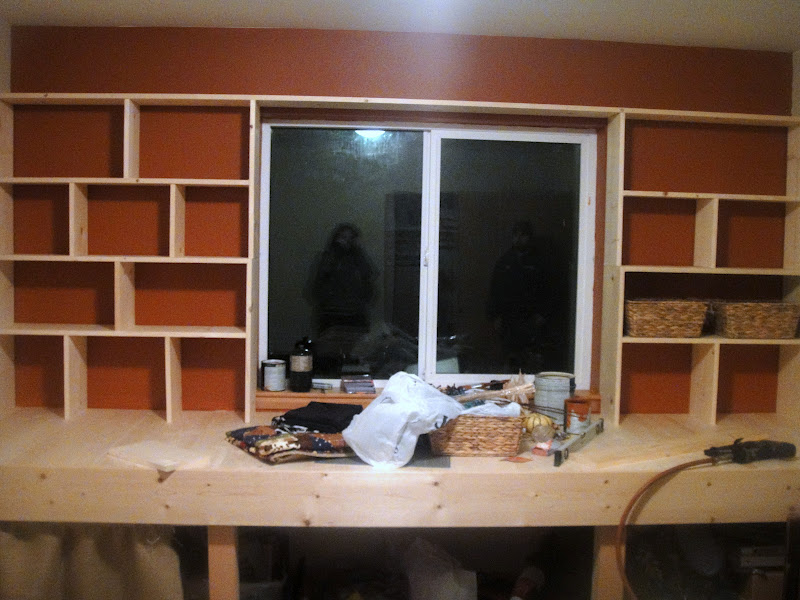
Now that the paint had been on the walls for a few days and was completely dry, Boyfriend was able to construct the shelves that would be put on the wall. It took a little time to figure out exactly how I wanted the shelves: should they be perfectly even, mismatched, or opposite on each side? We finally came to decide that a subtle mismatch would be best.

Just starting some shelves

All the shelves in place, and testing the fit of my storage baskets. 

Hung my turquoise horses up :)

Added some dividers to make the shelves into cubbies, and to provide support for shelving weight. 

All done!

Now I just need to unpack and organize everything in the craft room. But I still have another burlap project up my sleeve too...stay tuned!

Sunday, February 5, 2012

Craft Room Project - Part 3, A Burlap Covering

The Craft Room Project Series begins here.

Part Two, painting, here.

As shown in the last post, I had to find a way to cover up the unsightly-ness of the storage kept underneath the new craft table:


I already had a plan in place however. I knew I wanted to use burlap in the room. In an earlier visit to the craft store (day of painting, in fact), I bought a few yards of neutral colored burlap to use as curtains for the lower half of the desk.


Step one was to cut the burlap into approximate size. I needed two "curtains" for each side of the desk leaving a space in between for the chair. I considered the fraying edges for a moment, but decided I liked them in their natural and tattered stage.

Folding the burlap in half, I maintained about an inch of room on the top where a curtain rod could be slid through. Instead of running the heavy thick burlap through my sewing machine, I instead opted for a hand-sewn look. Not only would it achieve the soft yet rustic look I was going for, it was actually going to be the easier route for me. I utilized the small holes from the weave in the burlap for my stitches. Using twine and a crochet hook, I wove the twine through the burlap in approximately one-inch stitches.


To finish off the edges, I simply tied the burlap around into a knot and fashioned a twine bow in each end.


The finished curtain:


One more project up my sleeve for the burlap. More to come yet on the craft room. Stay tuned.

Thursday, February 2, 2012

Craft Room Project - Part 2

Craft Room Project Series begins here.

The next step in finishing the craft room was getting some color on those boring ole white walls. Deciding the color wasnt difficult, but finding the time and scarce extra cash was what was holding the project up. Paint was needed before any other woodwork could be done, so, with the weather providing for some snowed in days, I finally made my way to the Home Depot for paint. The colors were decided and painting went underway the following afternoon.

My friend helped me tape the walls and trim and I painted the walls, she later assisted in helping with the corners and ceiling edge. Taking special care along the edges of the newly built desk as stain or protectants had not yet been applied.


Now that colors were chosen and paint applied to the walls, the next project would be hiding this unruly mess underneath the table:


But I figured out a way real quick. Stay tuned.