Showing posts with label projects. Show all posts

Sunday, February 5, 2012

Craft Room Project - Part 3, A Burlap Covering

The Craft Room Project Series begins here.

Part Two, painting, here.

As shown in the last post, I had to find a way to cover up the unsightly-ness of the storage kept underneath the new craft table:


I already had a plan in place however. I knew I wanted to use burlap in the room. In an earlier visit to the craft store (day of painting, in fact), I bought a few yards of neutral colored burlap to use as curtains for the lower half of the desk.


Step one was to cut the burlap into approximate size. I needed two "curtains" for each side of the desk leaving a space in between for the chair. I considered the fraying edges for a moment, but decided I liked them in their natural and tattered stage.

Folding the burlap in half, I maintained about an inch of room on the top where a curtain rod could be slid through. Instead of running the heavy thick burlap through my sewing machine, I instead opted for a hand-sewn look. Not only would it achieve the soft yet rustic look I was going for, it was actually going to be the easier route for me. I utilized the small holes from the weave in the burlap for my stitches. Using twine and a crochet hook, I wove the twine through the burlap in approximately one-inch stitches.


To finish off the edges, I simply tied the burlap around into a knot and fashioned a twine bow in each end.


The finished curtain:


One more project up my sleeve for the burlap. More to come yet on the craft room. Stay tuned.

Thursday, February 2, 2012

Craft Room Project - Part 2

Craft Room Project Series begins here.

The next step in finishing the craft room was getting some color on those boring ole white walls. Deciding the color wasnt difficult, but finding the time and scarce extra cash was what was holding the project up. Paint was needed before any other woodwork could be done, so, with the weather providing for some snowed in days, I finally made my way to the Home Depot for paint. The colors were decided and painting went underway the following afternoon.

My friend helped me tape the walls and trim and I painted the walls, she later assisted in helping with the corners and ceiling edge. Taking special care along the edges of the newly built desk as stain or protectants had not yet been applied.


Now that colors were chosen and paint applied to the walls, the next project would be hiding this unruly mess underneath the table:


But I figured out a way real quick. Stay tuned.

Tuesday, December 20, 2011

Hand-sewn Tail Bags

So remember the gift bags I made? Now I can reveal what the real gifts were inside of them! Since they were for my horse-friends, I made each of them a personalized tail bags. Tail bags are sort of like large tube socks that we horse owners use to protect and keep clean the tails. An easy project and gifts I knew each person could use. 

I bought the dancewear fabric (they need some stretch) on Black Friday sale (and coupon) for $35, enough for two tail bags of each color. Once home, I cut them to size and pinned them in place for sewing. 


Sew all of the tail bags. Although easy, finding the time was another challenge, but with one free morning I got just about all of them sewn.


After sewn, I trimmed the edges,


Then cut the tops into four strips to use to tie the tail bag into the tail.


To finish off, I trimmed the tips to a V. I thought it just made them appear more clean and finished. 


Last step was to flip the tail bags inside out, and make sure I had made enough. :)


I had, in fact, and even had some extra to make and hopefully sell. 


Oh, and here is one of the extra red ones in action adorning my horse, Milo's, tail. 


They turned out great, I think! A quick and easy thoughtful gift, pricing at only about $4 a bag! With only about $1.50 into the materials for the gift bag, I stayed under my budget for gift giving this year!

Friday, December 16, 2011

How to Make Homemade Gift Bags

For Christmas this year I made all of my horse-friends personalized handmade presents. I dont want to reveal the gifts just yet, as not all of the recipients have opened them, so I will start from the outside and work in.


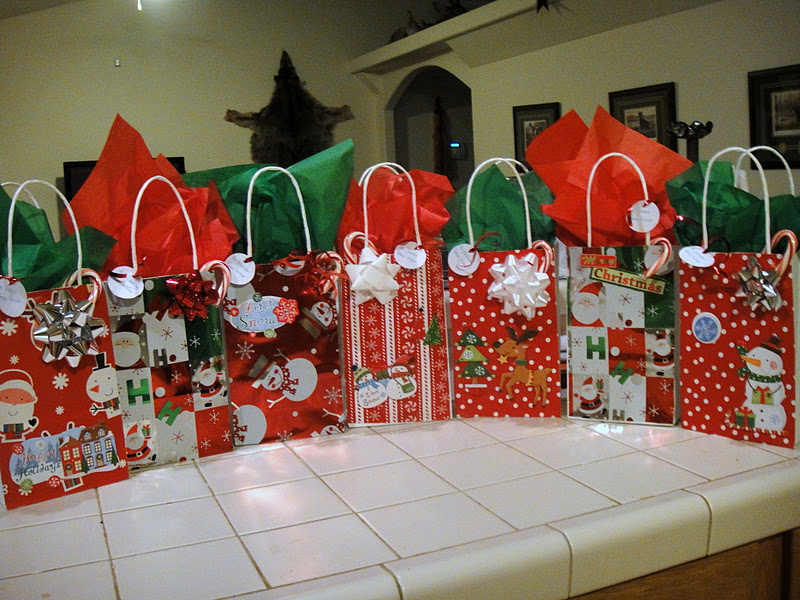
Materials used were a set of eight plain white gift bags, excess wrapping paper (you know, those scraps that you save but are really too small to reuse? I'm SO happy I saved those now!), and Christmas scrapbook accessories. I had ribbon and bows on hand as well as the spray adhesive needed for the paper.

Step one was to cut the scrap papers to size for the bag.


I sprayed the gift bag with adhesive spray, then applied the wrapping paper to both sides, but didnt glue any to the sides. Cut the excess paper on the sides (if any), and apply cute scrapbook decorations. 


After stuffing the gifts into the bags and adorning with tissue paper, I then attached name tags and bows for some personalization, and a candy cane to each bag for the finishing touch.


And when I realized that *gasp* I forgot someone at the barn, I whipped up another quick gift. I located some supplies from the pantry...


With the eighth unused gift bag, I put a few more scrapbook decorations onto it...


Fill the quick bag with the found supplies...


 And smile at yourself for the quick and easy fix to the forgotten gift!

Wednesday, December 7, 2011

Pine Wreath - a Little Bit of Twisp

Both mine and my Boyfriend's favorite place to be is Twisp, WA. About four hours from our home, its a sweet little country town tucked into the foothills of the North Cascades, joining up against the Okonogan National Forest. Boyfriend has family members there and at least once a year we make it over there and stay in their quaint cabin for Mule deer season. This last October was when we last visited, and I managed to scoop up many large and beautiful pinecones and black pine greens. They had been sitting in a couple paper shopping bags until I figured out what I wanted to make with them, as well as having the time, and the season.

I finally got the creative knowledge of what I wanted to do with it, or so I thought. On clearance a month or so ago I purchased a twig wreath from Joann's and planned on working with it as a base for the pine greens or pinecones. I grabbed a few supplies and started placing the greens. Then I figured out how I wanted them attached.


I used floral wire (already had on hand) and wrapped it through the "branches" and around the end to secure the pine to the wreath. 

The twig base already had some areas of sturdy wire, most likely to use to attach things to, so I attached the floral wire to the wire on the wreath base. 
 I just repeated this step around the entire wreath until I was satisfied with the fullness and that all of the pine bases were covered up.


'The next step was how to decorate it. I had the pinecones on hand, but with the large size of them, simply attaching them to the wreath didnt seem appropriate. I grabbed three of them, and had an idea. 

So first I wrapped twine around the center and tied at the back. I then made three twine bows, and hot glued them to the tops of the pinecones.


I then attached the pinecones (with their twine ropes) to the base of the wreath, avoiding bunching the pine. I used the excess twine to tie another bow to the top. But it just wasnt enough, so I used some glittery Christmas ribbon to make a more accentuated bow. I liked this ribbon because, although festive, it didnt scream Christmas and the plan was to hang this wreath all year long, and keep of bit of Twisp here at home.


Tuesday, November 1, 2011

Vintage Paper Wreath

I bought this used up and stained book from GoodWill, planing to use it for some type of wreath. What came first was an inspiration from Martha Stewart.com:


I used the same leaf trace offered from the website, but also formed a maple leaf version of my own. With no other cardstock available for color depth, I gathered some yellow leaves from the yard and pressed them in said book for a week.


The first step was to cut out the many, many leaves from the book pages. Martha's wreath calls for 100 leaves glued back to back. I cut 50 of each leaf type for a total of 100 leaves.

I watched Netflix while doing this.

It took a long time.

I didnt get to come back to the project for another week until my next day off. But throughout the week I stopped by Joann's and purchased a 12" wire floral wreath to attach the leaves to. Next I just started hot gluing leaves onto the wire frame and to each other.


As I glued the leaves in place, I had some pieces of twine wrapped around a pencil to start forming spiral "sprigs" to add onto the wreath.

I got closer to the end and tied a leaf-printed ribbon to the top.


I then removed the pressed (real) leaves from the remains of the book, and glued them into place as well as the twine spirals. I hung up the new wreath and stood back and enjoyed.


This is my favorite leaf with the lack of words on it. :)

I'm pleased with my Martha wreath knock-off!